- Make sure the sensor is touching the sight glass tube and is secured in place by the two black lock nuts.
- Plug the sensor into the Control Unit.
- Plug the Control Unit in and turn on the power. If the loader runs
and shuts off when material builds up in front of the sensor, you need no
adjustment.
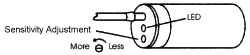
- If the loader does not run, turn the adjustment screw located on the
back side of the sensor with the screw driver provided counterclockwise until
the loader starts to load.
- The loader should turn off as material builds up in front of the sensor.
- If the loader continues to run after material builds up in front of
the sensor, turn the adjustment screw clockwise slowly until the loader shuts
off.
NOTE: Some units were equipped with a ground wire, make sure the green ground
wire is attached to the back of the sensor and secured under a mounting plate
hold down screw or attached to your machine.